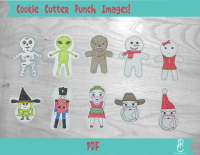
Every once in a while, a product comes out that you start using and you grow to love it and start using it a lot. That happened with this punch that cuts a cute little gingerbread cookie cutter image. Stampin’ Up had put this out years ago and they had also issued some coordinating stamps that you could punch out after stamping. Of course, you could color them as you please. I made a lot of cute little cards and enjoyed it but eventually I wanted to make some new images and that’s where this file began. I designed images that could be quickly cut out with the punch and these are completely different from any in my stash intended to be used with this punch.
This is a quick and easy way to get a lot of new little characters for cards using an old punch that may be in your stash. Though I used my punch a lot, it is such good quality that it still cuts a very crisp punch out and now I have created new images for my cards. If you have this punch, then you might want to use my file too so I’ve made it available in the vault.
Images include:
Gnome Santa, Cowboy Santa, Mrs. Claus, Gingerbread Girl, Snowman, Toy Soldier, Werewolf, Witch, Alien & Dia de Los Muertos Skeleton.
You get all ten images on one sheet. They are sized to work with the Cookie Cutter Punch created by Stampin’ Up. I also created a color version if you don’t want to color your own with markers or pencils.
Any colored images in this posting are to demonstrate a possible color combination you might choose when you color the punch outs.
Video: https://youtu.be/fY47FtgIW5E
Files:
- Formatted to print on an 8.5 x 11 inch page.
- High resolution 300 dpi.
- Two (2) printable PDF files available for FREE download from my vault at RhondaCreations.com.
- If you need Adobe Reader to open the PDF, then visit Adobe.com to download the software for free.
Printing Tips:
- I highly recommend using card stock to get the best punch outs. I have cut down 12×12 sheets of scrapbook card stock and used it in my printer with no problems.
- If you are using an inkjet printer, then I would recommend allowing the prints to dry fully before punching.
Download Steps:
- Hover over “The Vault” across the top of this page to reveal the pull-down menu.
- Select the file you want to download and click on it. The file will automatically download to your computer.
- Typically you can find the files in the “Downloads” folder on your computer. It will be compressed or “zipped” if there is more than one file for the item you selected.
- Double click to access the files or right-click and choose to extract the files to a folder you designate on your computer for immediate and future use.
If you have any questions, then please let me know and I’ll be happy to assist.
Rhonda Cards and Rhonda Creations designs are intended for PERSONAL USE. If you would like to sign up as a reseller or use them commercially, then please contact me directly or through my website at http://www.RhondaCreations.com.
© 2017-present Design Copyright retained by Rhonda Cards and Rhonda Creations
